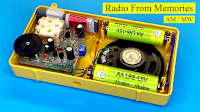
make radio AM
Building a MW (Medium Wave) radio electronic DIY kit can be a fun and educational project for electronics enthusiasts. Here's a general guide on how you might approach such a project:
1. **Research and Gather Components**: Start by researching different DIY MW radio kits available online or in hobbyist stores. Look for kits that suit your skill level and interests. Gather all the necessary components listed in the kit, including resistors, capacitors, transistors, tuning components, an antenna, and a speaker.
2. **Read the Instructions**: Carefully read through the instructions provided with the kit. Understand the circuit diagram and the function of each component. Make sure you have a clear understanding of how the radio works before starting assembly.
3. **Assembly**: Begin assembling the circuit on a breadboard or PCB (Printed Circuit Board), following the instructions provided. Take your time and double-check connections to ensure everything is connected correctly. Pay close attention to polarity when inserting components like capacitors and diodes.
4. **Tuning Circuit**: Most MW radios require a tuning circuit to select the desired frequency. This typically involves variable capacitors and coils that can be adjusted to tune into different stations. Follow the instructions to assemble and calibrate the tuning circuit for optimal performance.
5. **Power Supply**: Determine the power requirements for your radio and assemble or acquire the appropriate power supply. Many DIY radio kits operate on batteries for portability, but some may require an external power source.
6. **Testing and Troubleshooting**: Once the circuit is assembled, carefully test each stage of the radio to ensure it's functioning as expected. Use a multimeter to measure voltages and check for any shorts or open circuits. If you encounter any issues, refer to the troubleshooting guide provided with the kit or seek help from online forums and communities.
7. **Enclosure**: Once you're confident that the radio is working correctly, consider housing it in an enclosure to protect the circuitry and improve aesthetics. This could be a simple plastic or wooden box, or you could get creative and design a custom enclosure using 3D printing or other techniques.
8. **Antenna**: A proper antenna is essential for good reception. Experiment with different antenna designs to optimize reception quality. You may need to position the antenna vertically or horizontally depending on your location and the direction of the radio station you're trying to receive.
9. **Enjoy**: Once your DIY MW radio is complete and working well, sit back and enjoy listening to your favorite stations. Experiment with tuning to discover new stations and fine-tune the radio for optimal performance.
Remember to always prioritize safety when working with electronics, especially when dealing with electricity and soldering irons. If you're unsure about any aspect of the project, don't hesitate to seek guidance from experienced hobbyists or professionals.


